
Dapr and Azure Functions: Part 4 – Deploy via Kubernetes
In Part 3, we deployed the services to Docker using Docker Compose.
In this part, we’re going to do the same with Kubernetes.
As an aside, I love Elliot Kim’s hot take on Kubernetes:
A few weeks ago I decided to go on a journey of learning Kubernetes. Initially because it sounded really cool, useful to learn, and also because it sounded like the solution to every DevOps question out there. Is there a reliable container management tool? Kubernetes. Is there a way to automate deployment? Kubernetes. Is there anything that can stop the stock market from sliding further (so I can stop losing my gains for the year)? Kubernetes. Is there a way we can stop the E. coli outbreak in romaine lettuce? Kubernetes. Just feels like the right answer for everything.
🤣
I digress…
If you didn’t set up Kubernetes when you installed Docker Desktop, the first step is to enable it.

From the command line, you should get a response if you type kubectl
We’re ready to rock and roll.
Step 1: Create the Base YAML File
The eShopOnDapr reference project partitions each part of the deployment into separate files. For the sake of simplicity, we’ll put everything into one YAML file since the project is quite simple at the moment.
I created a directory at the root:
deployk8s-deployment.yaml
And started from:
|
1 2 3 4 |
apiVersion: v1 kind: Namespace metadata: name: helloworld |
You can run this immediately from the terminal as:
kubectl apply -f k8s-deployment.yaml
And you’ll see the output:
![]()
Step 2: Add the HelloWorld App Service
The next step is to add the helloapp to the deployment.
(Note: the --- breaks up the file into separate documents)
|
1 2 3 4 5 6 7 8 9 10 11 12 13 14 15 16 17 18 19 20 21 22 23 24 25 26 27 28 29 30 31 32 33 34 35 36 37 38 39 40 41 |
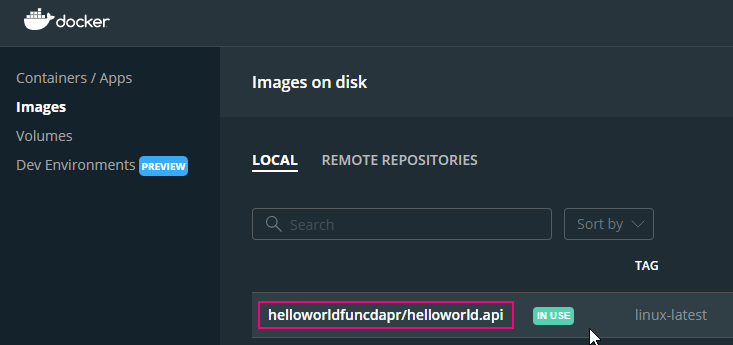
apiVersion: v1 kind: Namespace metadata: name: helloworld --- kind: Deployment apiVersion: apps/v1 metadata: name: helloapp namespace: helloworld labels: app: helloworld service: helloapp spec: replicas: 1 selector: matchLabels: service: helloapp template: metadata: labels: app: helloworld service: helloapp annotations: # These are the same parameters that we saw earlier from the dapr CLI and the Dockerfile dapr.io/enabled: "true" dapr.io/app-id: "helloapp" dapr.io/app-port: "80" spec: containers: - name: helloapp # This is our image that was published to the local Docker container registry image: helloworldfuncdapr/helloworld.api:linux-latest imagePullPolicy: IfNotPresent ports: - name: http # The port we are exposing to the host for this service. containerPort: 8181 protocol: TCP |
You’ll notice the annotations section allows us to inject Dapr into the pod (make a mental note; more on this later) and specify the parameters to pass to the Dapr runtime.
In the spec we tell Kubernetes the image to use for this container:
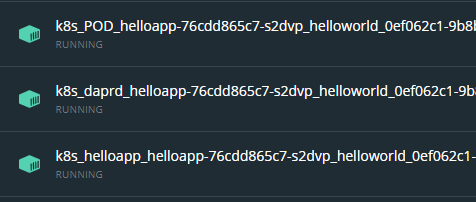
If we run: kubectl apply -f k8s-deployment.yml, we can see the following containers in Docker Desktop:
We can similarly stop and delete the Kubernetes assets by running kubectl delete -f k8s-deployment.yml:

Now let’s add the service description.
The Kubernetes documentation provides a great description of why this is necessary:
Motivation
Kubernetes Pods are created and destroyed to match the state of your cluster. Pods are nonpermanent resources. If you use a Deployment to run your app, it can create and destroy Pods dynamically.
Each Pod gets its own IP address, however in a Deployment, the set of Pods running in one moment in time could be different from the set of Pods running that application a moment later.
This leads to a problem: if some set of Pods (call them “backends”) provides functionality to other Pods (call them “frontends”) inside your cluster, how do the frontends find out and keep track of which IP address to connect to, so that the frontend can use the backend part of the workload?
Enter Services.
In Kubernetes, a Service is an abstraction which defines a logical set of Pods and a policy by which to access them (sometimes this pattern is called a micro-service). The set of Pods targeted by a Service is usually determined by a selector. To learn about other ways to define Service endpoints, see Services without selectors.
For example, consider a stateless image-processing backend which is running with 3 replicas. Those replicas are fungible—frontends do not care which backend they use. While the actual Pods that compose the backend set may change, the frontend clients should not need to be aware of that, nor should they need to keep track of the set of backends themselves.
For the purposes of this walkthrough, it’s not strictly necessary to introduce Services, but we’ll add at least one to get the hang of it.
|
1 2 3 4 5 6 7 8 9 10 11 12 13 14 15 16 17 18 19 20 21 22 23 24 25 26 27 28 29 30 31 32 33 34 35 36 37 38 39 40 41 42 43 44 45 46 47 48 49 50 51 52 53 54 55 56 57 58 59 |
apiVersion: v1 kind: Namespace metadata: name: helloworld --- kind: Deployment apiVersion: apps/v1 metadata: name: helloapp namespace: helloworld labels: app: helloworld service: helloapp spec: replicas: 1 selector: matchLabels: service: helloapp template: metadata: labels: app: helloworld service: helloapp annotations: dapr.io/enabled: "true" dapr.io/app-id: "helloapp" dapr.io/app-port: "80" spec: containers: - name: helloapp image: helloworldfuncdapr/helloworld.api:linux-latest imagePullPolicy: IfNotPresent ports: - name: http containerPort: 80 protocol: TCP --- kind: Service apiVersion: v1 metadata: name: helloapp namespace: helloworld labels: app: helloworld service: helloapp spec: type: NodePort ports: - port: 80 targetPort: 80 nodePort: 30500 protocol: TCP name: http selector: service: helloapp |
Take note of line 51-57 above where we use NodePort to map a host port to the cluster.
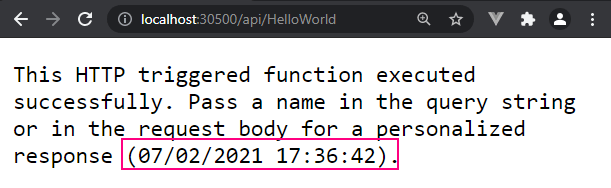
This means that when we access the application, we do so via http://localhost:30500. At this point, we can hit the URL and we should see the default Functions placeholder page. We haven’t connected the date “backend” service yet so we’ll get an error if we invoke the service endpoint.

Step 3: Add the CurrentDate App Service
Now we repeat the deployment for the CurrentDate app service:
|
1 2 3 4 5 6 7 8 9 10 11 12 13 14 15 16 17 18 19 20 21 22 23 24 25 26 27 28 29 30 31 32 33 34 35 36 37 38 39 40 41 42 43 44 45 46 47 48 49 50 51 52 53 54 55 56 57 58 59 60 61 62 63 64 65 66 67 68 69 70 71 72 73 74 75 76 77 78 79 80 81 82 83 84 85 86 87 88 89 90 91 92 93 |
apiVersion: v1 kind: Namespace metadata: name: helloworld --- kind: Deployment apiVersion: apps/v1 metadata: name: helloapp namespace: helloworld labels: app: helloworld service: helloapp spec: replicas: 1 selector: matchLabels: service: helloapp template: metadata: labels: app: helloworld service: helloapp annotations: dapr.io/enabled: "true" dapr.io/app-id: "helloapp" dapr.io/app-port: "80" spec: containers: - name: helloapp image: helloworldfuncdapr/helloworld.api:linux-latest imagePullPolicy: IfNotPresent ports: - name: http containerPort: 80 protocol: TCP --- kind: Service apiVersion: v1 metadata: name: helloapp namespace: helloworld labels: app: helloworld service: helloapp spec: type: NodePort ports: - port: 80 targetPort: 80 nodePort: 30500 protocol: TCP name: http selector: service: helloapp --- kind: Deployment apiVersion: apps/v1 metadata: name: dateapp namespace: helloworld labels: app: helloworld service: dateapp spec: replicas: 1 selector: matchLabels: service: dateapp template: metadata: labels: app: helloworld service: dateapp annotations: dapr.io/enabled: "true" dapr.io/app-id: "dateapp" dapr.io/app-port: "80" spec: containers: - name: dateapp image: helloworldfuncdapr/date.api:linux-latest imagePullPolicy: IfNotPresent ports: - name: http containerPort: 80 protocol: TCP |
You’ll notice that this time, we didn’t add the service; as mentioned previously it’s not strictly needed.
If we run this now, we get the following output:

And now we get this in the UI when we try to hit the Functions HTTP endpoint:
🎉 We’ve connected all of our containers and deployed via Kubernetes.
We left a mental note above with regards to the annotations. Notice that with Kubernetes, we did not need to manually define the sidecar containers as we did with the Docker Compose file.
If you have the Kubernetes extension installed in VS Code, you can open the Kubernetes YAML file and you’ll see that the sidecars and necessary ports are injected into each pod for you:
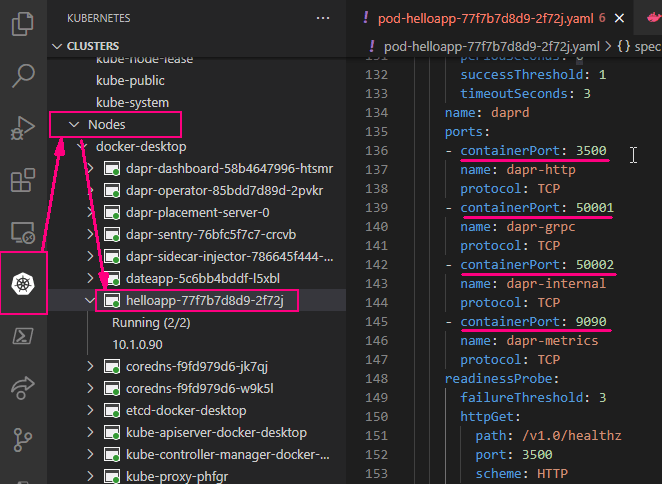
The annotations trigger the Kubernetes mutating webhook admission controller. There’s some documentation about it over on this Microsoft blog post:
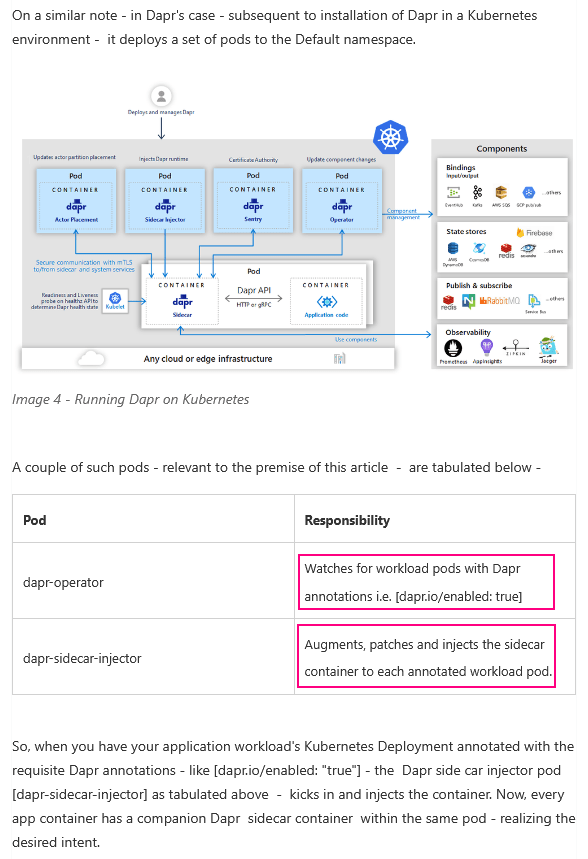
So when the dapr-operator container finds a pod with dapr.io/enabled: true, it knows to inject the Dapr runtime into the pod.
Not sure how this will work with regards to deploying into AWS EKS or Azure AKS, but we’ll find out!.
Quick Thoughts and Performance
Maarten Balliauw has some thoughts on using Azure Functions as a web API:
Many folks out there, including some of the official information, see Azure Functions as a convenient way to quickly deploy a simple API. And that’s somewhat correct, and often perfectly fine for a lot cases
Except, if you need full-blown middleware and the options the ASP.NET Core web pipeline offers, maybe… Well, maybe ASP.NET Core is the choice for those.
I disagree with Maarten entirely; as far as I’m concerned, it seems that the majority of your microservices API can and should probably be written and deployed into a Functions runtime instead of a monolithic ASP.NET Web API. The simplicity of the implementation with Azure Functions and the speed is fantastic. If needed, it is also possible to add middleware to the Functions when using an isolated process model (basic DI is possible using FunctionsStartup)
Used with Dapr, it allows you to very quickly build lightweight, event-driven microservices that are easy to refactor and evolve independently of each other. The beauty of using Dapr is that individual teams could even build different services with different languages to better fit the workload for that service.
Even though we have a super simple set of services with a “front” and a “back” end, it is easy to see how we could iteratively build on this established base and add more endpoints, more services, and more modules. Used with something like Azure Arc, it’s possible to build a very diverse set of solutions which includes the ability to deploy on-premise and manage via Azure.
How does it perform?
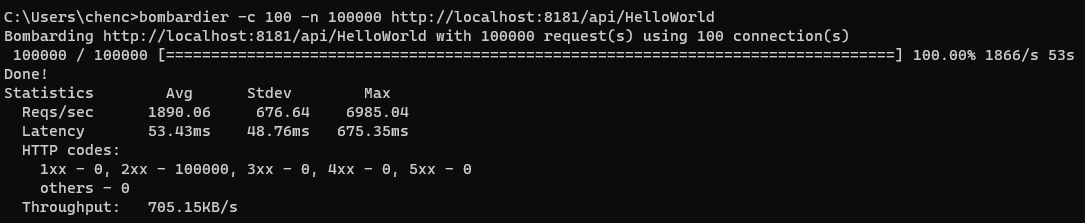
To test this, we’ll need to add an equivalent .NET Web API app and we’ll hit them both with 2 back-to-back passes using bombardier (the exact specs of the system and what not do not matter much I think since we’re interested in the relative results and I did not inject the HttpClient as a singleton. I also did not tune any of the pod memory or CPU configuration; everything is left at default).
The .NET Web API app is a .NET Core app created using dotnet new webapi --no-https per the instructions in the Microsoft docs.
Functions (static):
Web API (pay no attention to the URL; I replaced the body of the code with the exact same implementation):

Functions (non-static instance):

Looks comparable to me with Functions having marginally better performance when written as a non-static instance. On the memory front, the Web API peaked around 1 GB of memory compared to 955MB for Functions (not much difference, in peaks, but the Functions runtime was noticeably slower to build up to the peak and significantly slower to release the memory).
Next Part
If you made it this far, pat yourself on the back! This was a lot to digest!
You’ll notice that we haven’t actually done anything useful or used any of the Dapr building blocks. I have purposely focused this set of articles on operationalization rather than the already excellent documentation on components.
I was originally going to cut this short here at getting it deployed locally via Kubernetes, but why not push it into AWS and/or Azure and see how that works? Lets fully operationalize this bad boy in Part 5!


3 Responses
[…] Part 4 – Running in Kubernetes […]
[…] Next, we want to do the same with Kubernetes! […]
[…] In Part 4, we deployed our simple Hello World solution via Kubernetes locally. […]